
Help center > Getting started > Importing data from your previous system
Importing data from your previous system
Moving to Practicepicnic from another system takes two steps:
- Download one or more files from your old system. To stay organized, create a folder on your Desktop named PracticepicnicImport and save everything you download into it.
- Zip that folder and upload it to Practicepicnic at Settings > Import Data.
Find your previous system below for the export steps, then follow the shared Zip your folder and Upload to Practicepicnic instructions at the bottom of this page.
- Importing data from SimplePractice
- Importing data from TheraNest / Ensora Health
- Importing data from TherapyNotes
- Importing data from CounSol
- Importing data from Jane
- Importing data from TherapyAppointment
- Importing data from TherapyZen
- Importing data from Acuity
- Importing data from Charm EHR
- Importing data from DrChrono EHR
- Importing data from IntakeQ
- Importing data from Sessions Health
- Importing data from Practice Better
- Don't see your platform? Request a custom import
- Zip your PracticepicnicImport folder
- Upload to Practicepicnic
Importing data from SimplePractice
We'll download the following from SimplePractice:
- Client Details CSV
- Client Demographics CSV
- Full Client Documents ZIP file
Before you start, please make sure:
- Your computer has at least 10–20 GB of free space
- You have a stable internet connection
- You've created a folder on your Desktop named PracticepicnicImport
As you download each file, move it into this folder so everything stays organized.
Download Client Details
- In SimplePractice, go to Analytics > Reports > Client Details.
- Make sure All client statuses is selected.
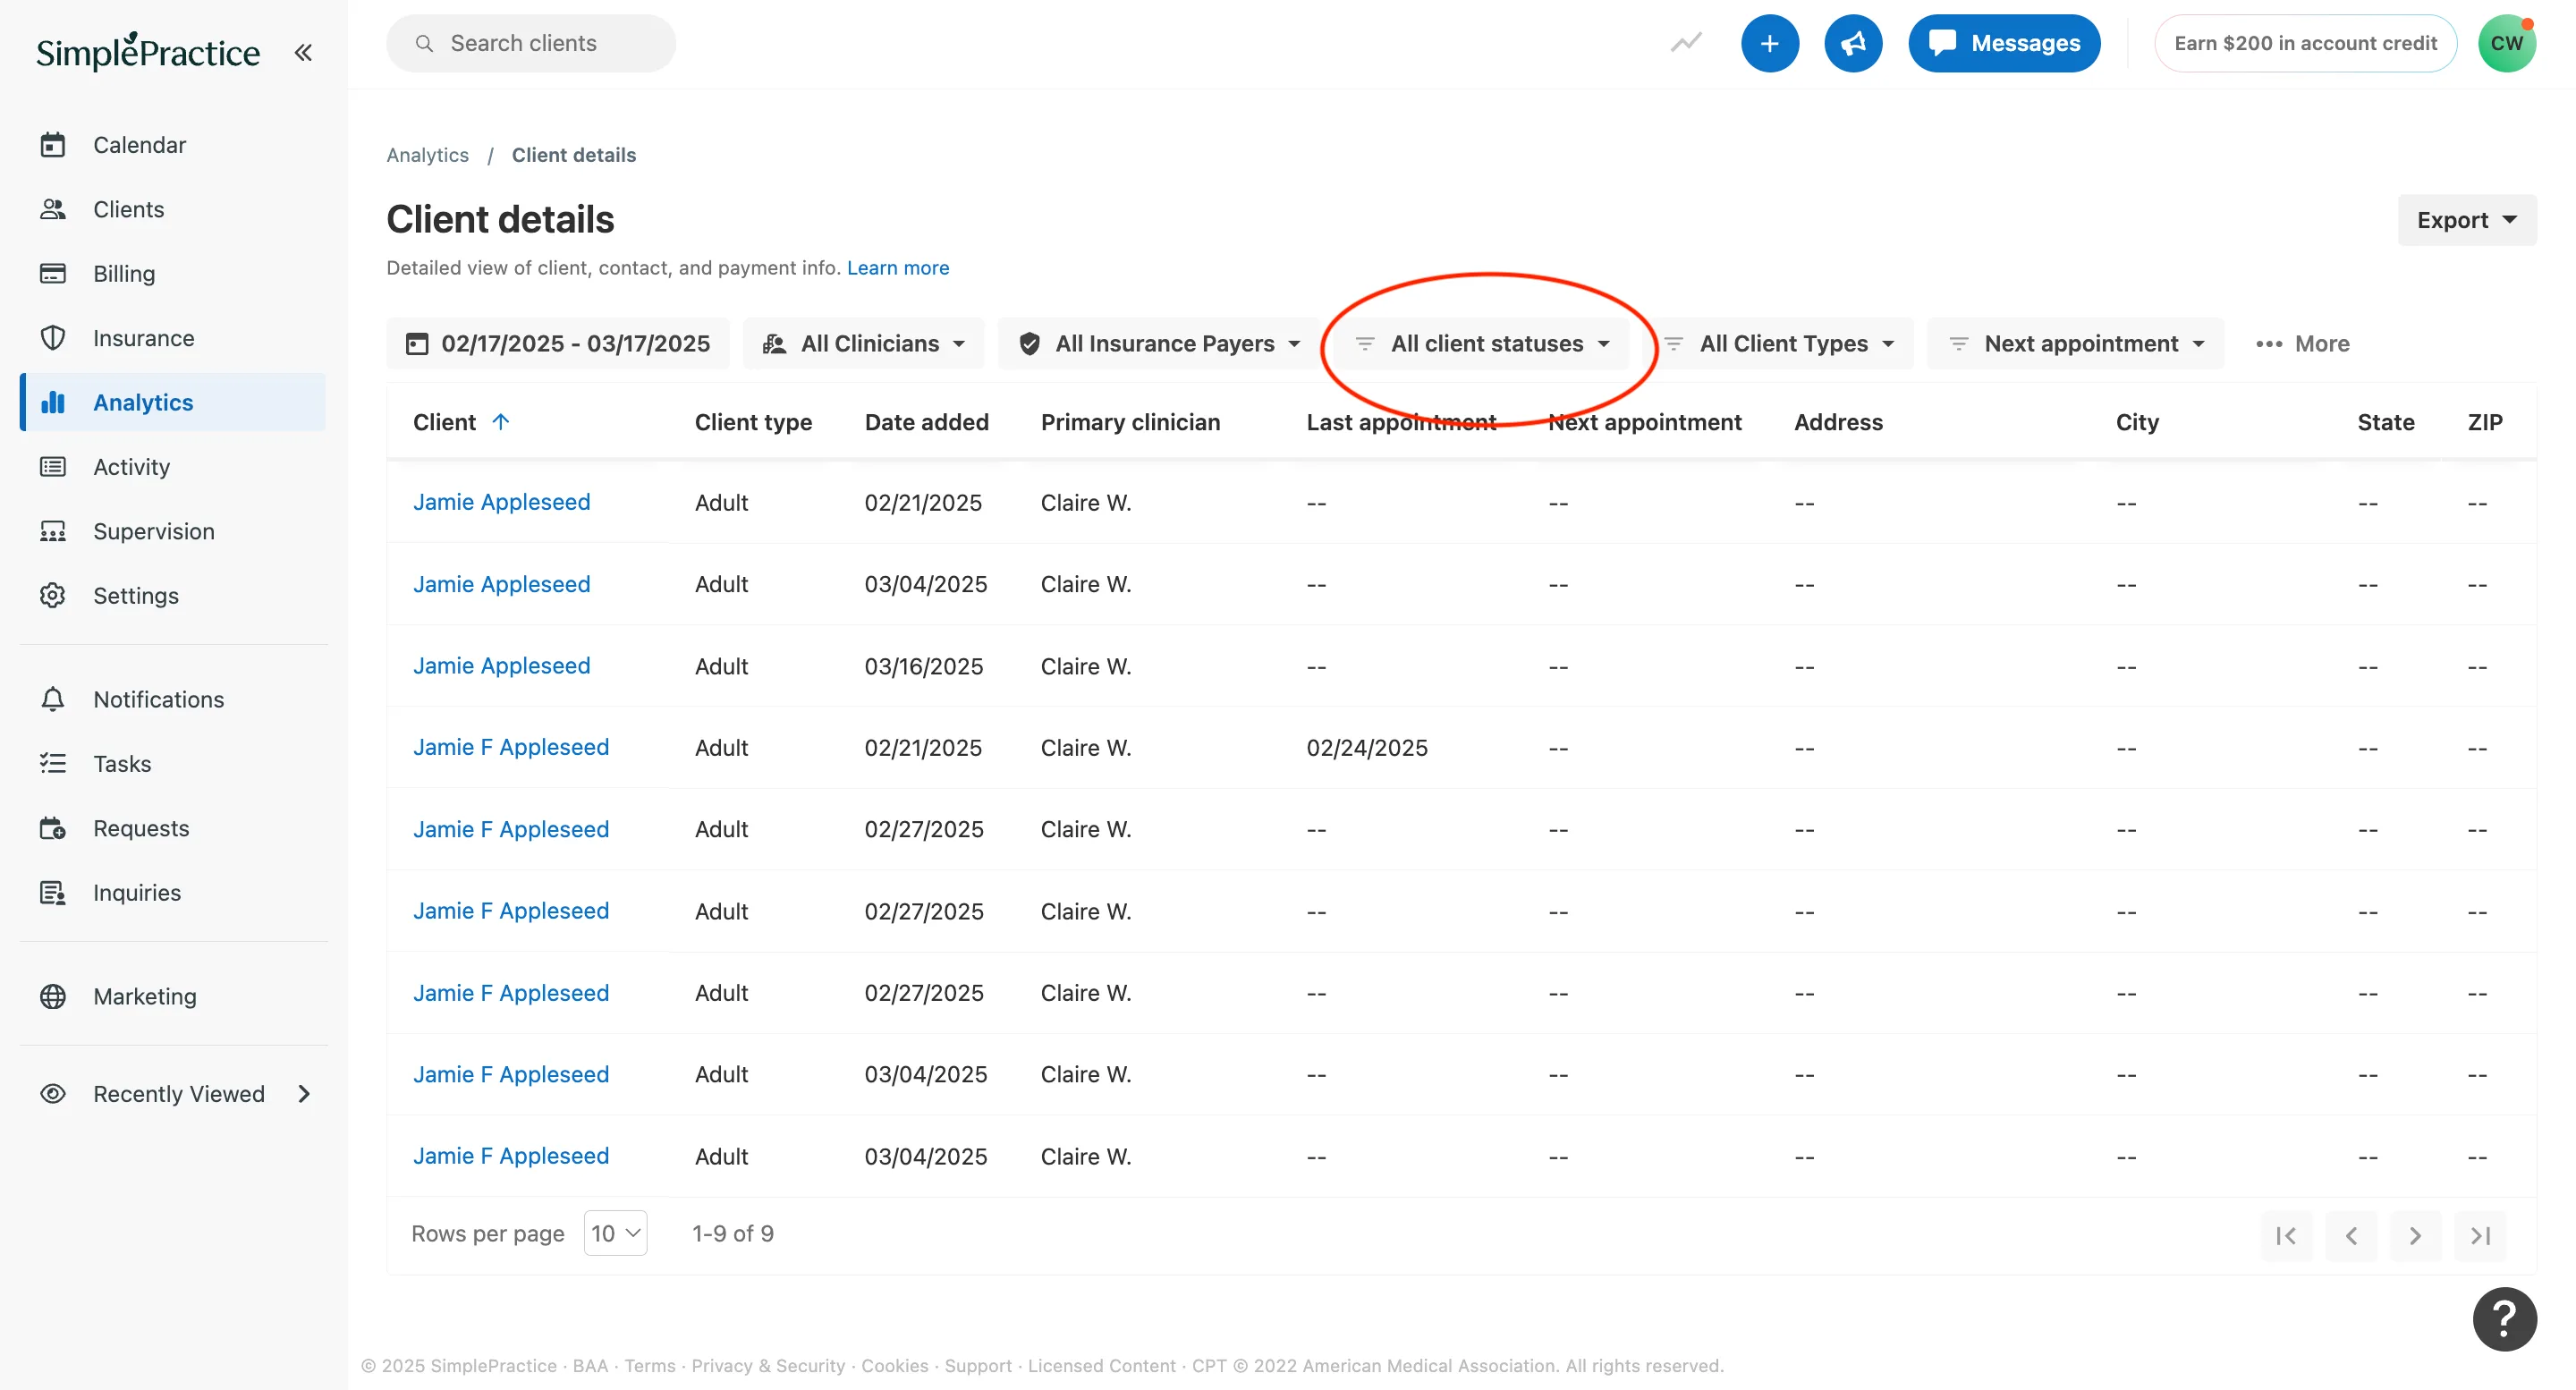
- Click Export in the top right.
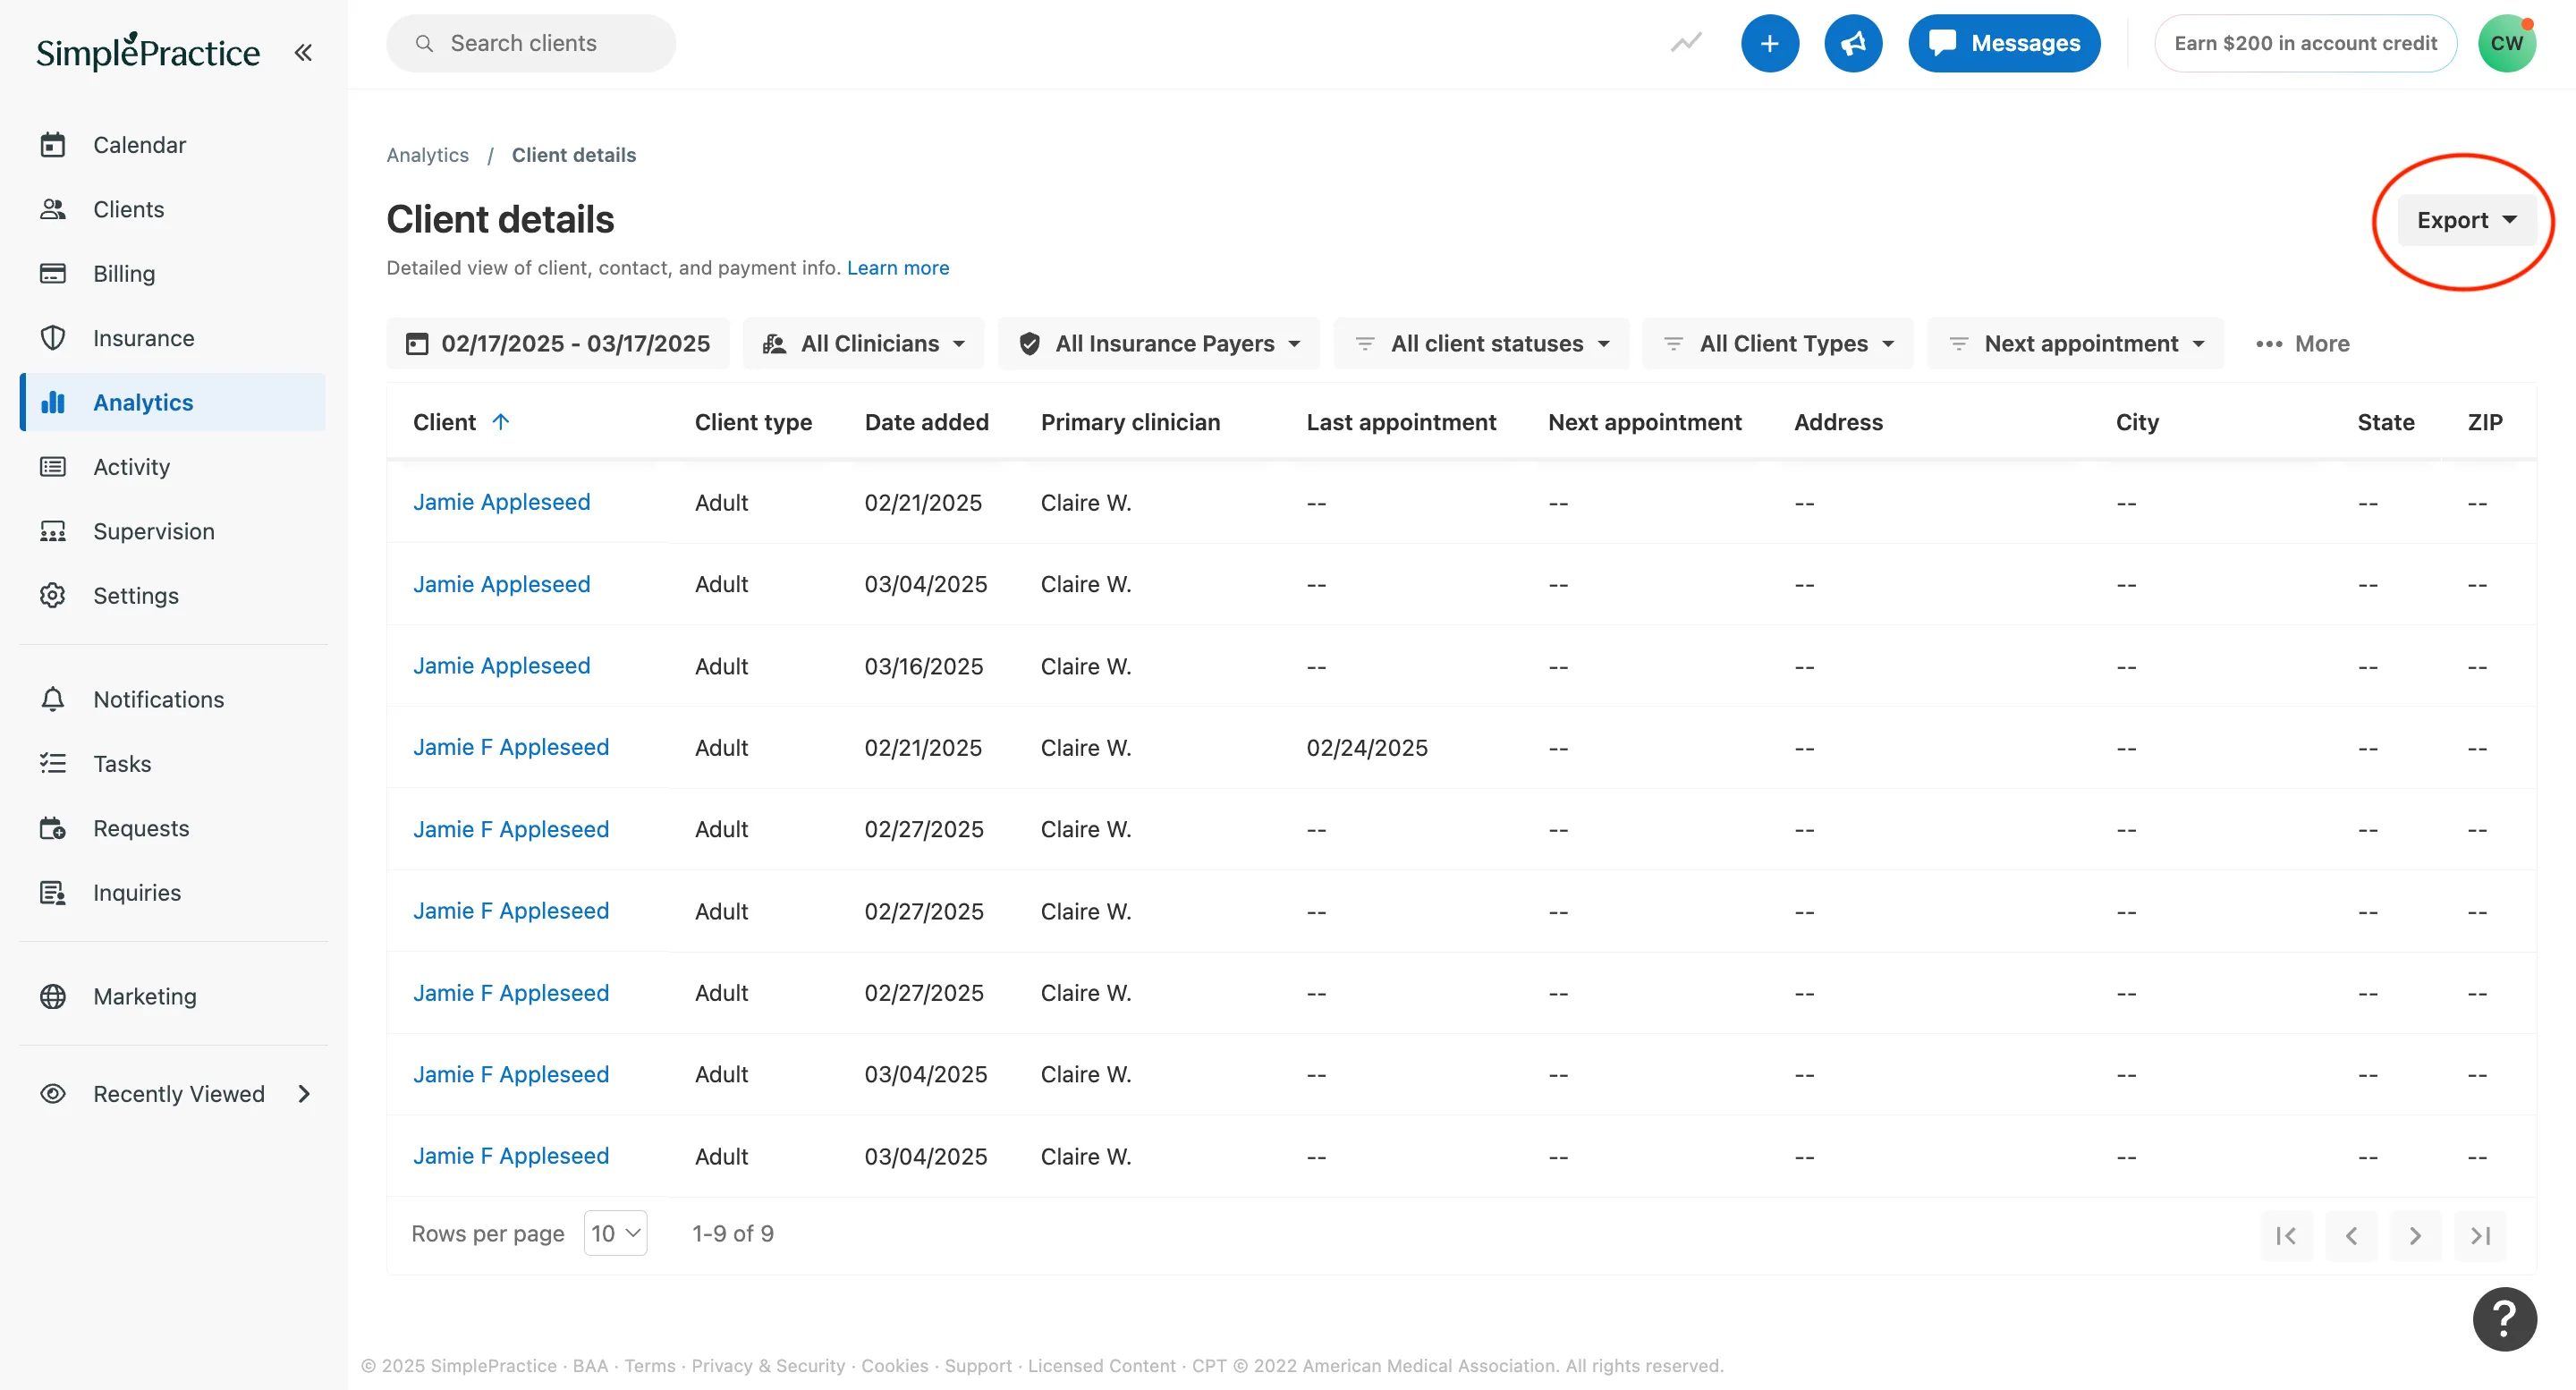
- Select CSV.
- Move the downloaded file into your PracticepicnicImport folder.
Download Client Demographics
- In SimplePractice, go to Analytics > Reports > Client Demographics.
- Click Export in the top right.
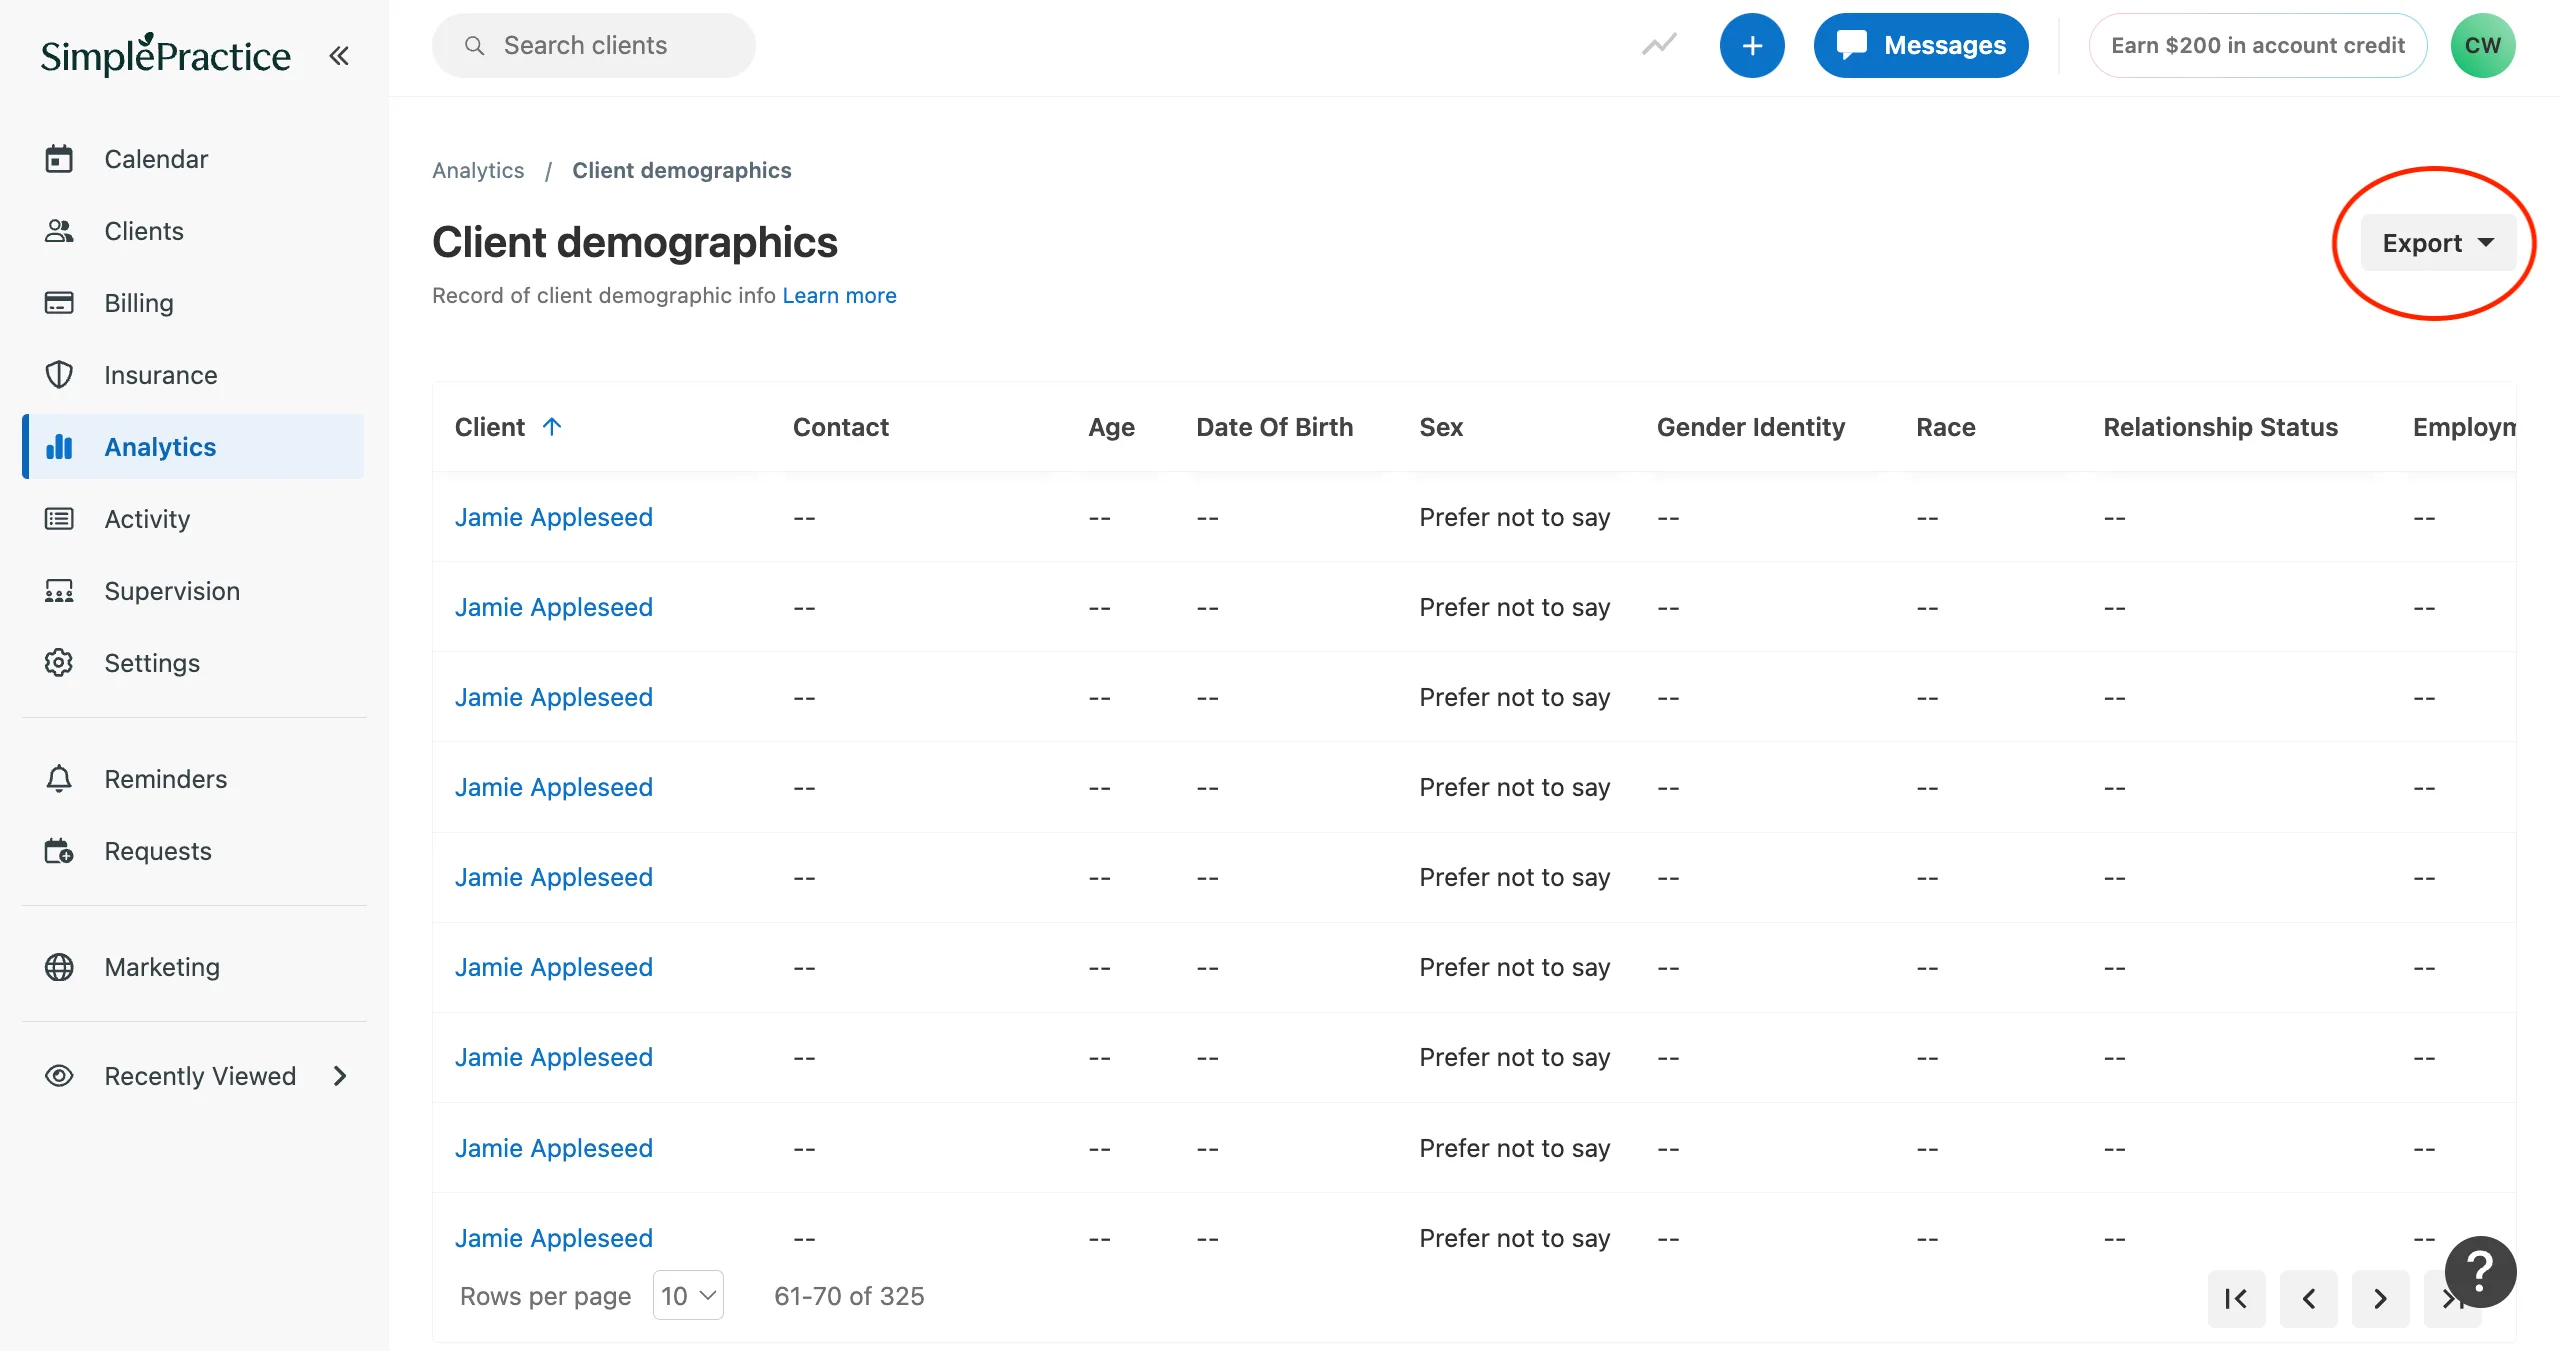
- Select CSV.
- Move the downloaded file into your PracticepicnicImport folder.
Download Client Documents
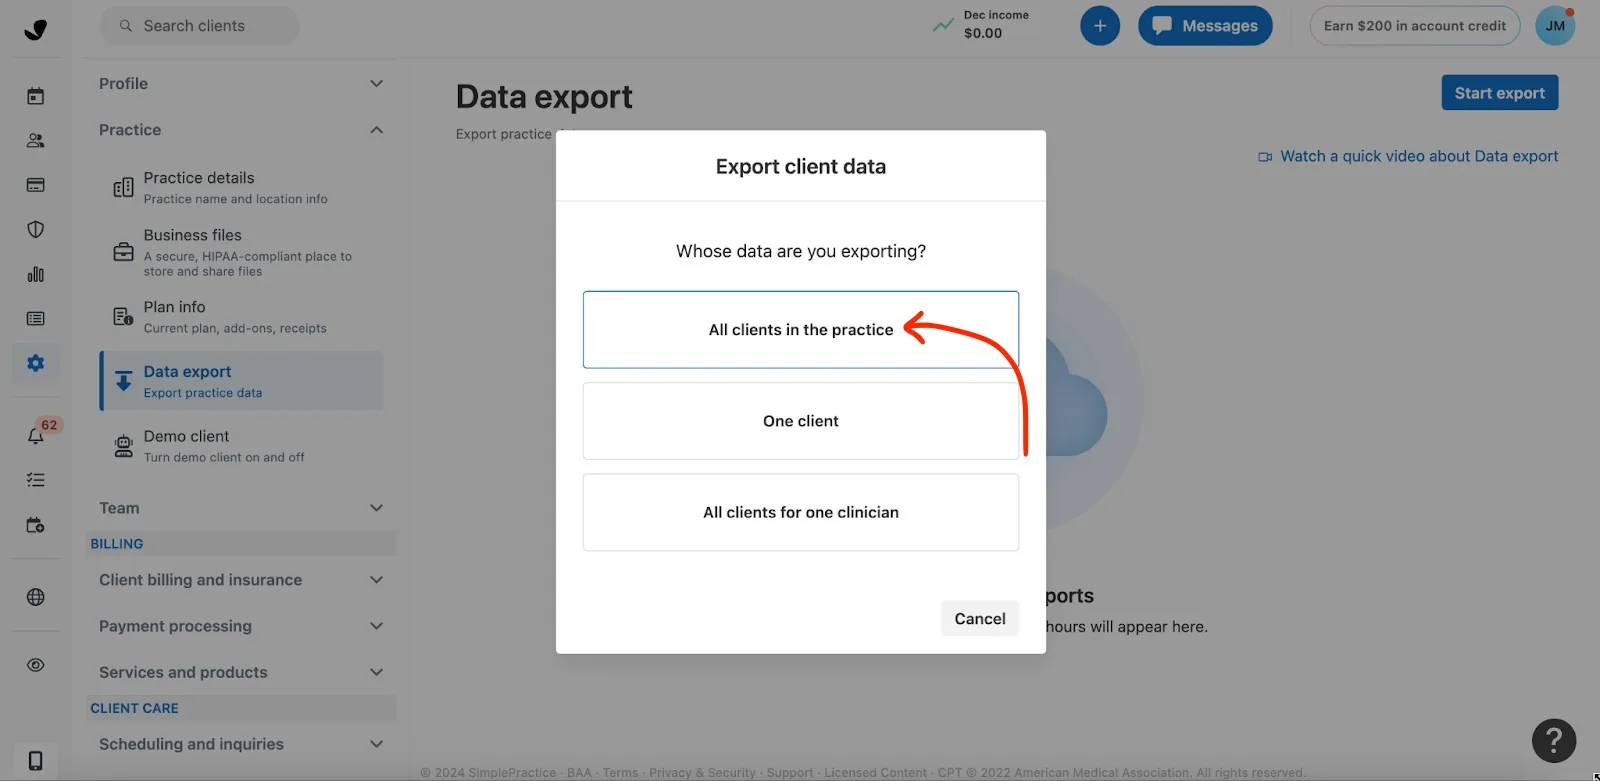
- In SimplePractice, go to Settings > Practice > Data Export.
- Click Start export.
- Choose All clients in the practice.
- Select Complete and uncheck the Require password checkbox.
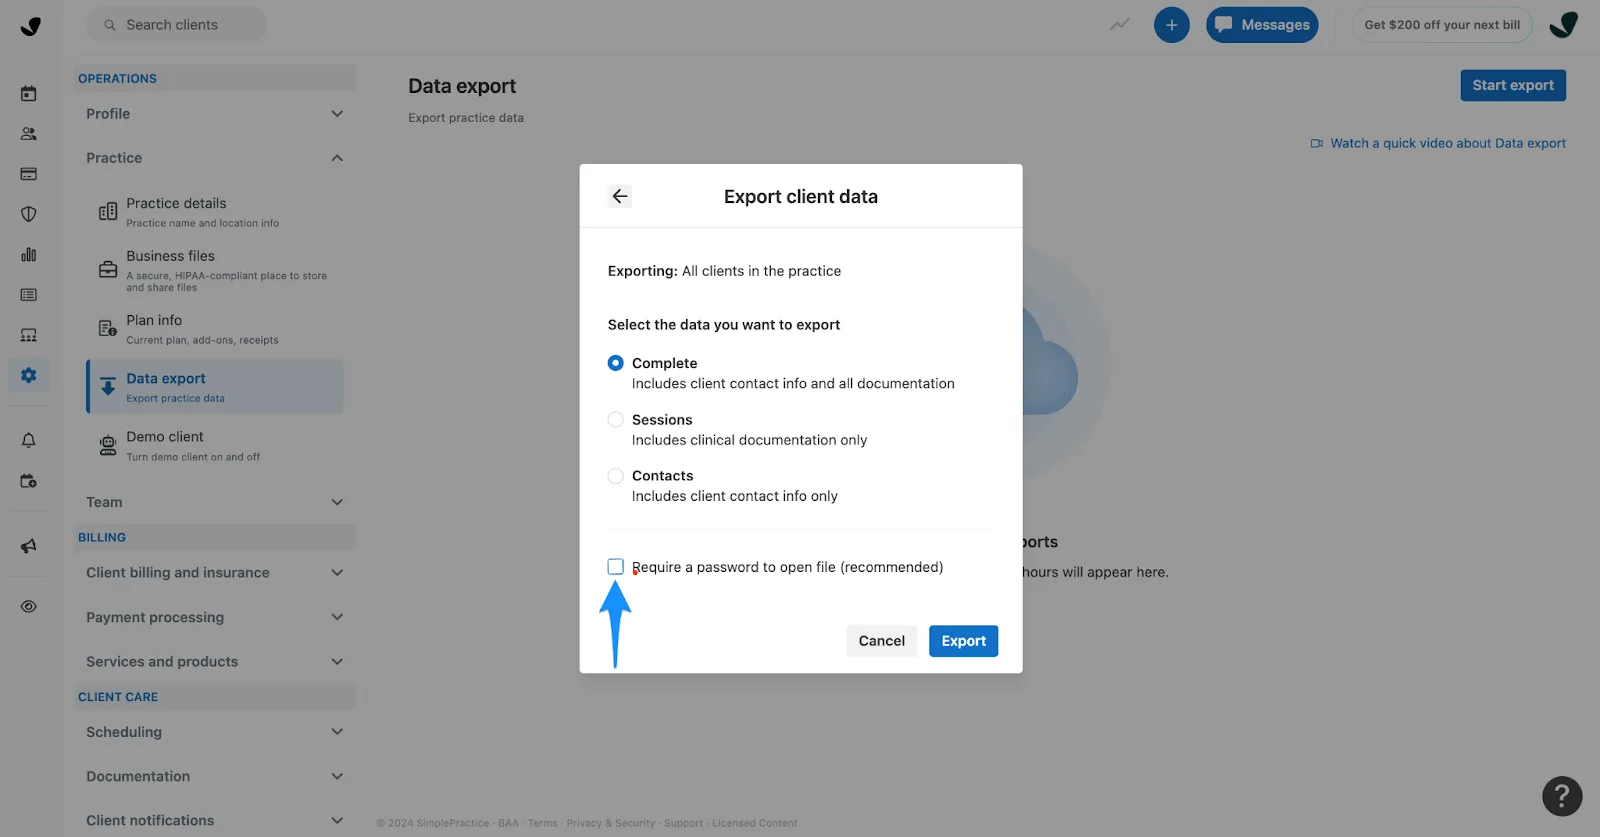
Important: The Require password box must be unchecked. Practicepicnic's import will not work with a password-protected export (we're going to be uploading the data through our secure data import tool, so the password protection isn't necessary).
- SimplePractice will email you when the export is ready. This may take a few hours.
- Download the ZIP file from the email or from the Data Export page.
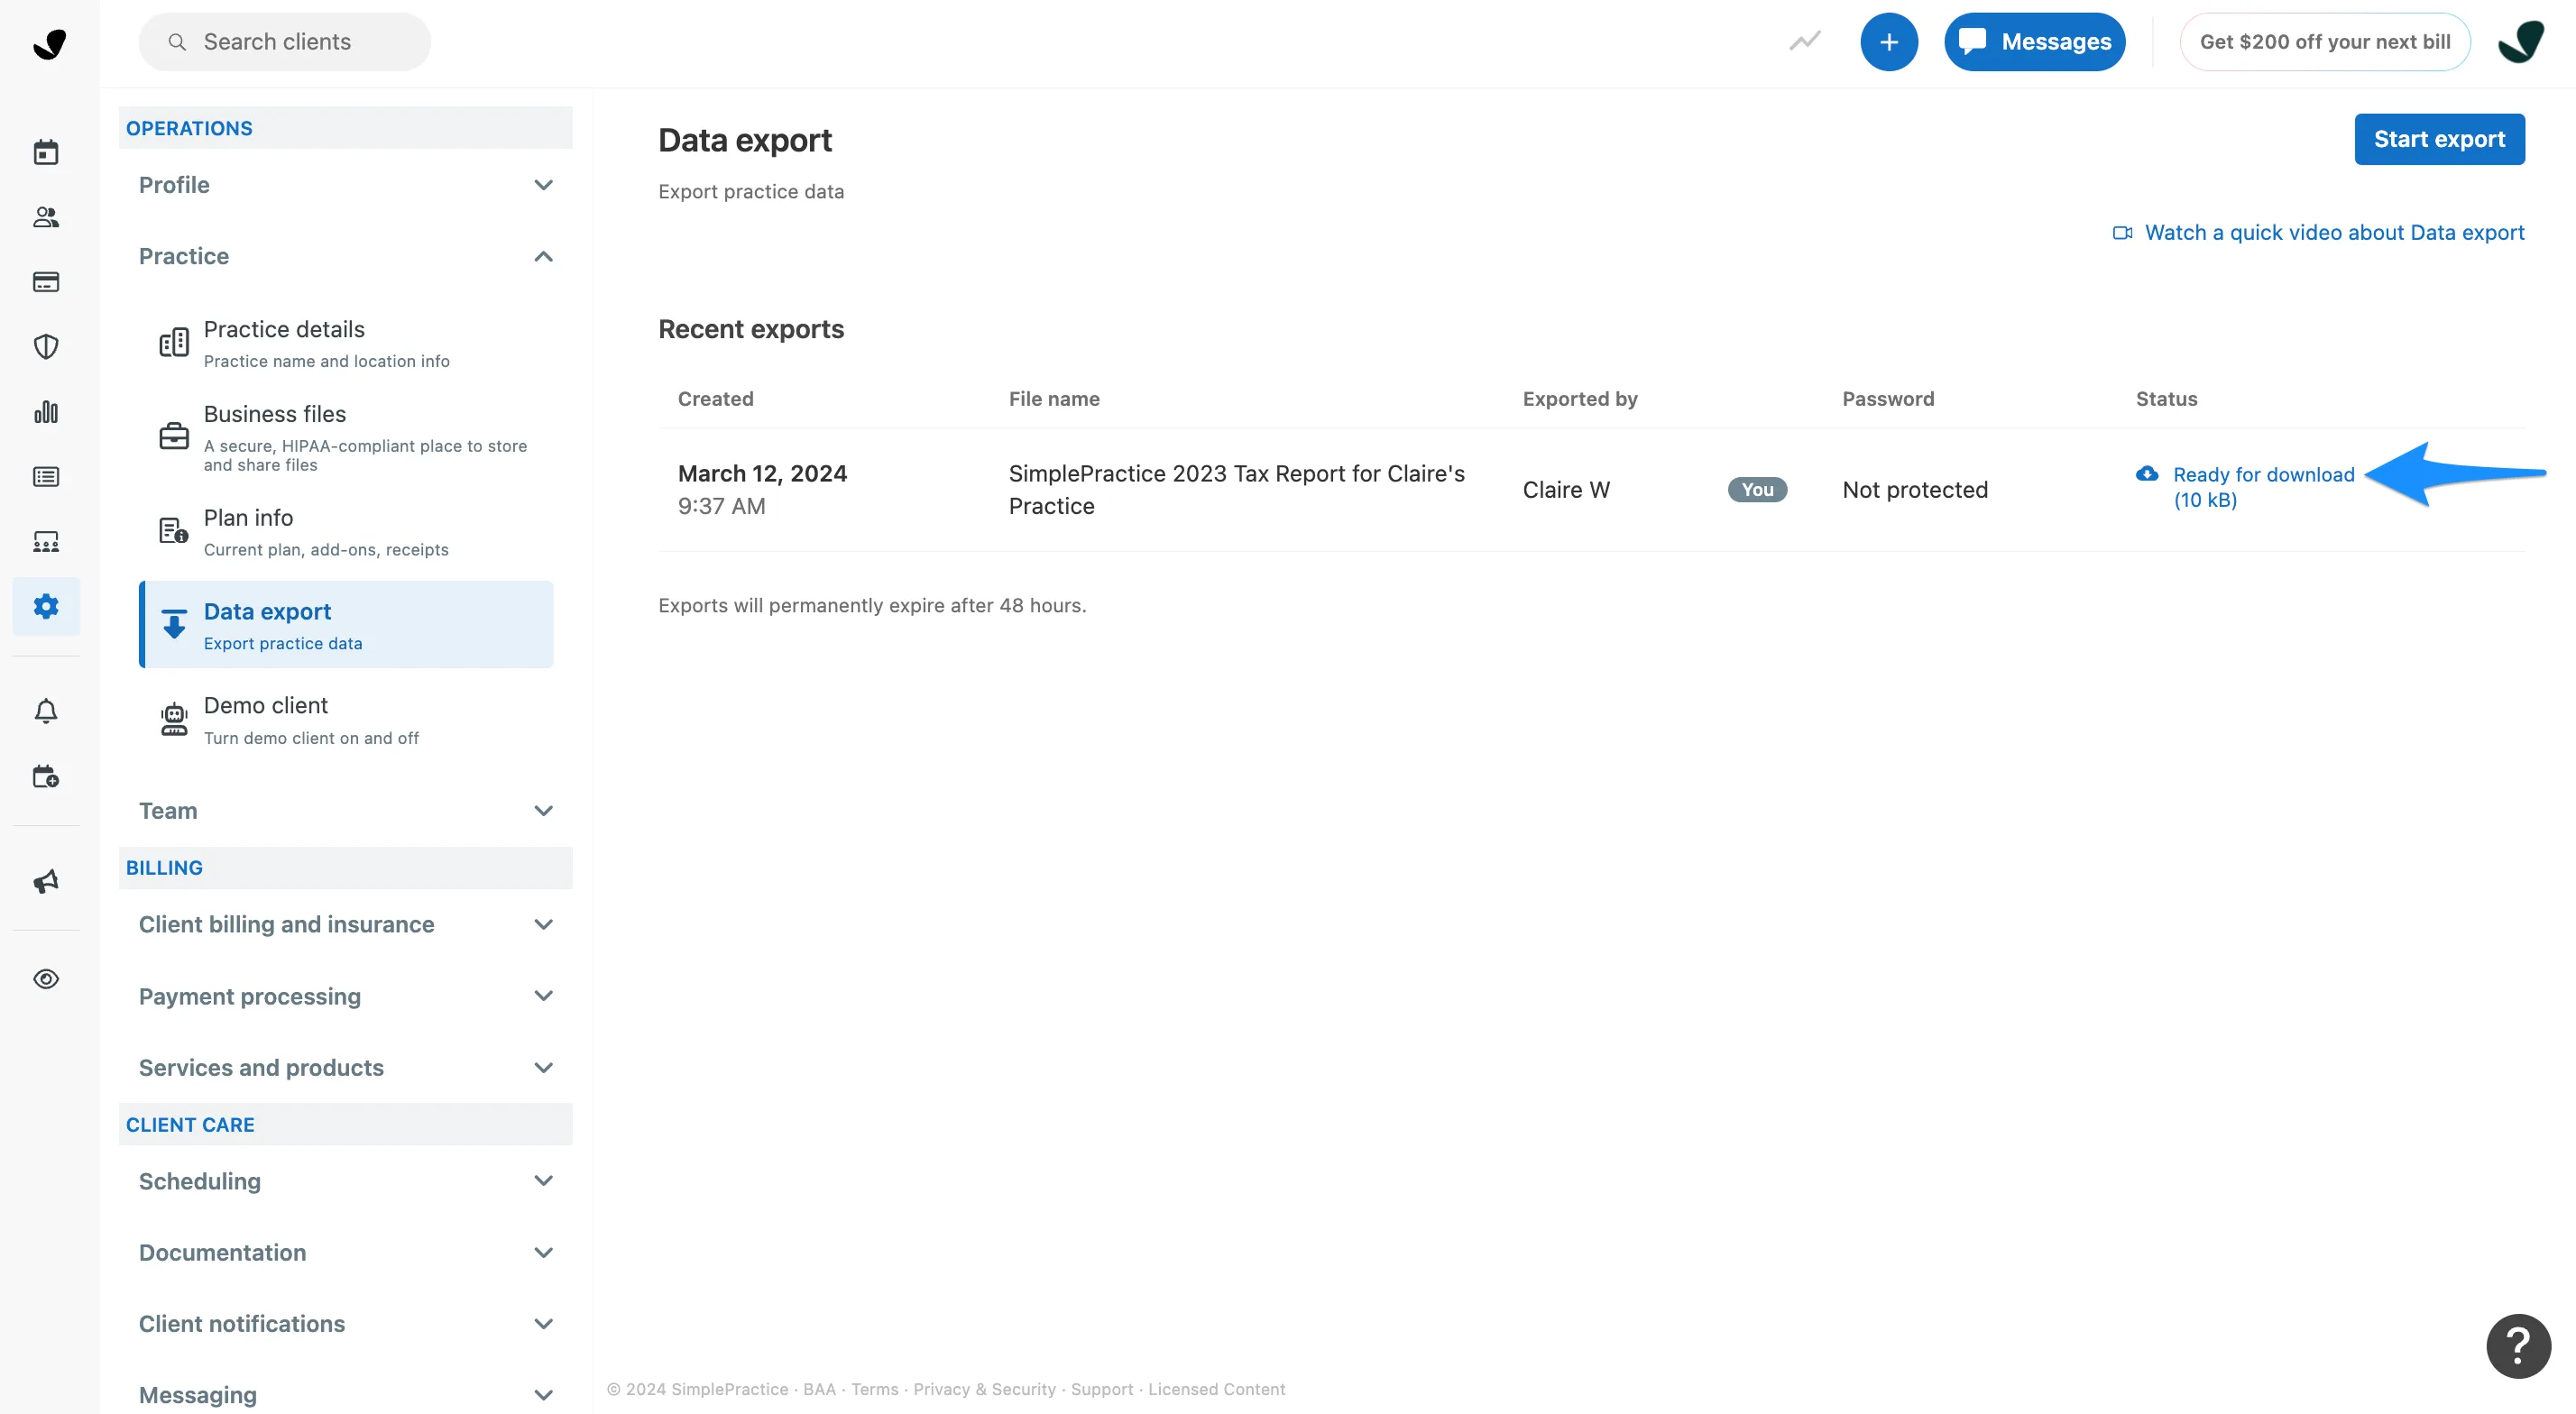
- Move the ZIP file into your PracticepicnicImport folder. The ZIP file may be large, so to save space we recommend cutting and pasting it into the folder instead of copying it.
When you've saved these files into your PracticepicnicImport folder, zip the folder and upload it to Practicepicnic.
If you're having trouble, please contact your account manager or support@practicepicnic.com.
Importing data from TheraNest / Ensora Health
TheraNest is now part of Ensora Health — the steps below work whether your account is branded TheraNest or Ensora Health.
We'll download the following:
- Client list
- Client notes history
Create a folder on your Desktop named PracticepicnicImport to keep these files together.
Download the client list
- In TheraNest, click Organization in the left-hand menu.
- Navigate to Export data at the bottom of the menu.
- On the Export Data page, click the Export all clients button.
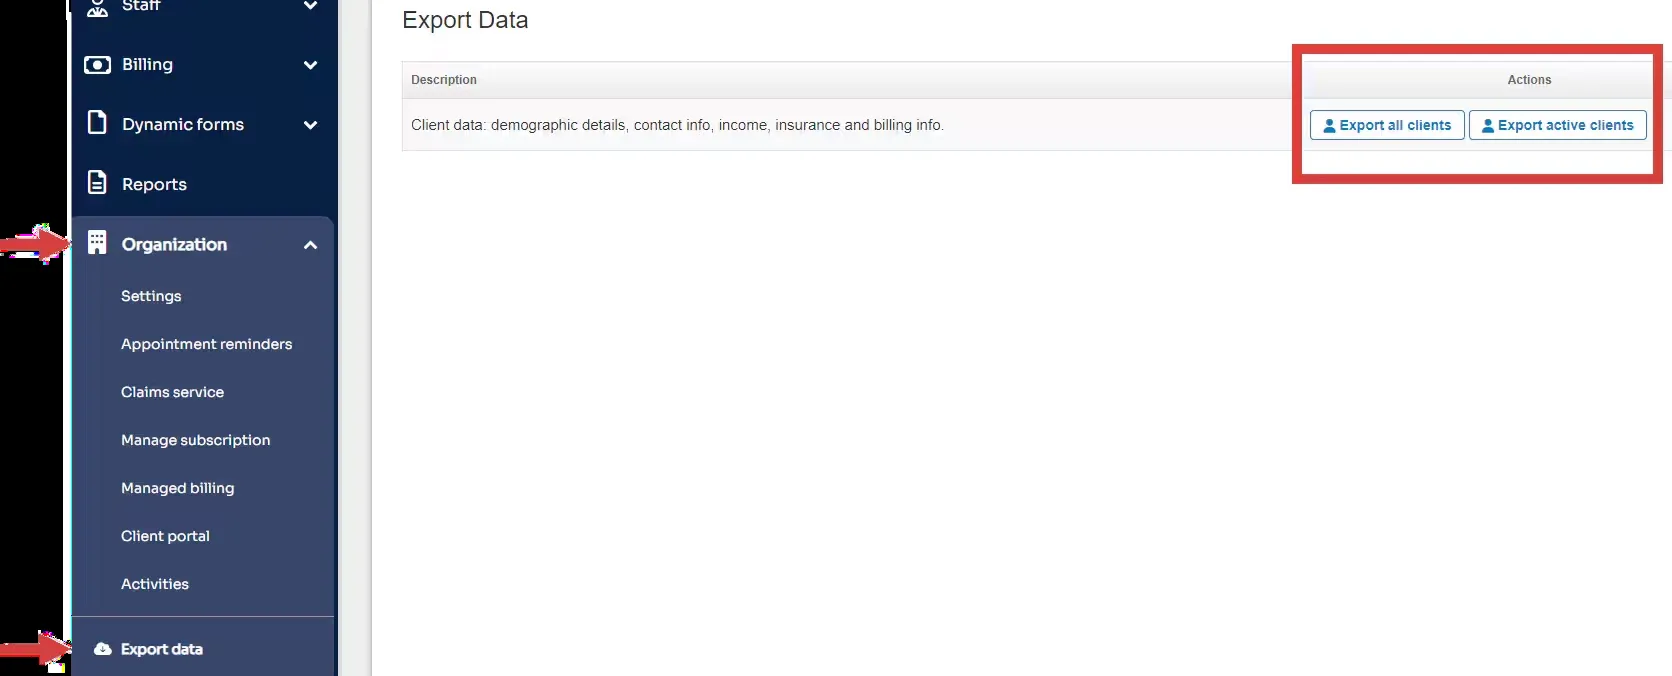
- The file will download onto your computer. Move it into your PracticepicnicImport folder.
Download client notes history
TheraNest only lets you export client notes one client at a time. For each client you'd like to bring over, complete the steps below and save the downloaded file into your PracticepicnicImport folder. (The file name doesn't matter — Practicepicnic's import tool will sort it out after you upload.)
- Navigate to a client's profile.
- Click on their Reports tab and select Notes History.
- Click the Print Notes History for All Cases button.
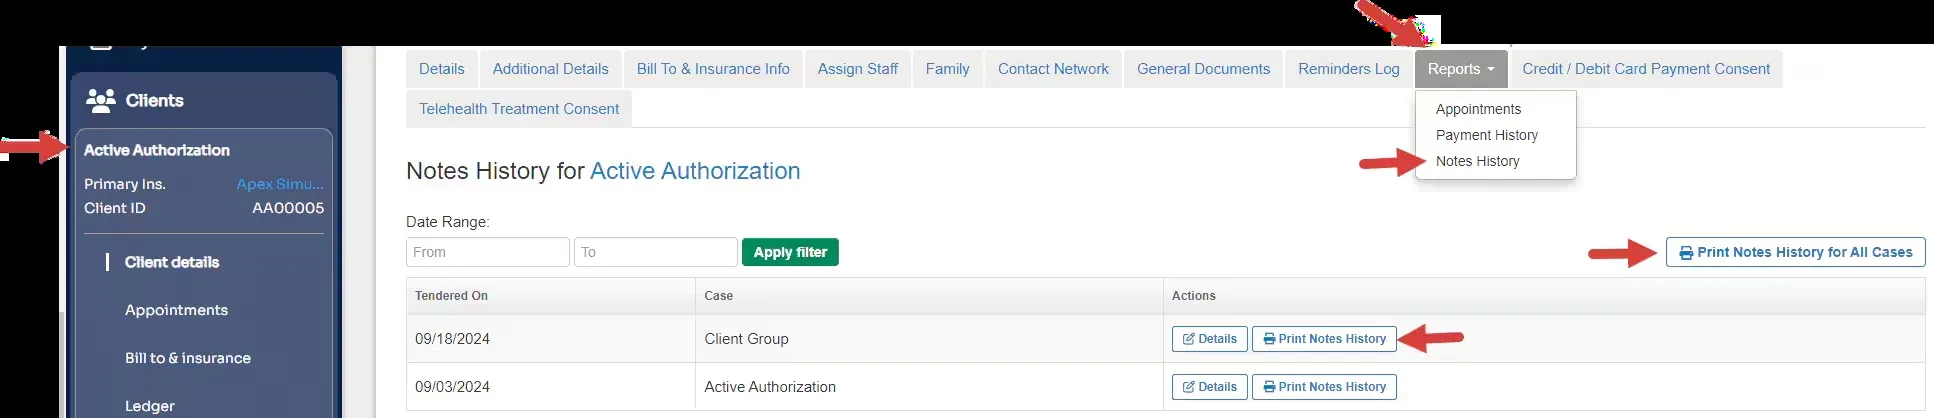
- Save the file into your PracticepicnicImport folder, then repeat for each client.
When you've saved these files into your PracticepicnicImport folder, zip the folder and upload it to Practicepicnic.
If you're having trouble, please contact your account manager or support@practicepicnic.com.
Importing data from TherapyNotes
Moving over from TherapyNotes happens in two stages:
- Client list and billing info — download two spreadsheets from TherapyNotes and upload them to Practicepicnic first.
- Client notes and files — bring over your charts and documents in a second import.
Do stage 1 first and upload it on its own, then come back for stage 2. Handling the two stages as separate imports keeps things organized, especially since your notes and files can take a while to gather.
Step 1: Client list and billing info
Create a folder on your Desktop named PracticepicnicImport to keep these files together.
Patient list
- Go to the Patients section.
- Filter to active patients, then click Export to Spreadsheet to download the list.
- Repeat with the filter set to inactive patients so you have both files.
- Move both files into your PracticepicnicImport folder.
Billing transactions
- Go to Billing > Search Billing Transactions.
- Set Clinician and Location to Any, set Type to Appointment, choose a date range that covers your full history, and set Status to Any.
- Click Search Billing Transactions, then click Export Spreadsheet.
- Move the file into your PracticepicnicImport folder.
Once these two files are in your folder, zip the folder and upload it to Practicepicnic. Finish this import before moving on to your client notes below.
Step 2: Client notes and files
You have three ways to bring over your client notes and files. Pick whichever fits your practice.
Option 1: Export them yourself, client by client
You can bulk-export all of a single client's notes and files at once, but TherapyNotes doesn't offer a way to export every client's notes in one step — so you'll repeat this for each client.
- Open a patient's profile and go to the Documents tab.
- Click Download Multiple, Select All, and save the file from your browser.
- Files that were uploaded directly to the patient (rather than generated by TherapyNotes) aren't included in Download Multiple. Download and save those individually.
- Save everything into your PracticepicnicImport folder, then repeat for each patient.
When you've saved these files, zip the folder and upload it to Practicepicnic as a second import.
Option 2: Request a full export from TherapyNotes support
Contact TherapyNotes support at therapynotes.com/contact and ask them for a full export of your client notes and files. Be aware that results here are mixed — TherapyNotes doesn't always honor these requests, and they may charge a fee to prepare the export. If they do send you the files, put them in your PracticepicnicImport folder, zip the folder, and upload it to Practicepicnic.
Option 3: Let us do it for you (free)
We offer a free, fully hands-off "done-for-you" migration. Contact your account manager or email support@practicepicnic.com, and we'll handle exporting your notes and files and importing them into Practicepicnic for you. We recommend this path if you're a larger practice with more data than you can realistically move by hand and TherapyNotes support won't provide a full export.
If you're having trouble, please contact your account manager or support@practicepicnic.com.
Importing data from CounSol
We'll download the following from CounSol:
- Client list
- Client records (includes notes, progress notes, treatment plans, and more)
Create a folder on your Desktop named PracticepicnicImport to keep these files together.
Client list
- Select the Clients icon, then scroll to the bottom of the page.
- Click Active Clients - List Download Zip/CSV.
- Select the fields you'd like to include (we recommend all of them), then download the file.
Client records
- Select the Clients icon, click the Export tab, then click New Export.

- Choose the sections you'd like to include (we recommend checking every section) and set Clients with Status and Clients with Label to Any. If you're given the option, pick All assigned counselors.
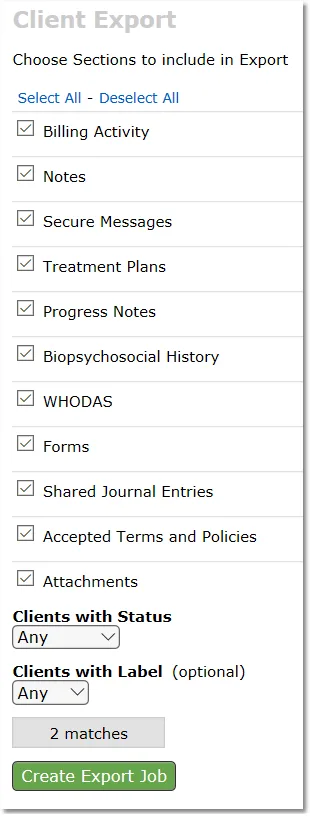
- Click Create Export Job, then return to the Export page to download the zip when it's ready — CounSol will email you once the export job is complete. (Note: CounSol record exports don't include original dates, so imported entries will show the import date.)
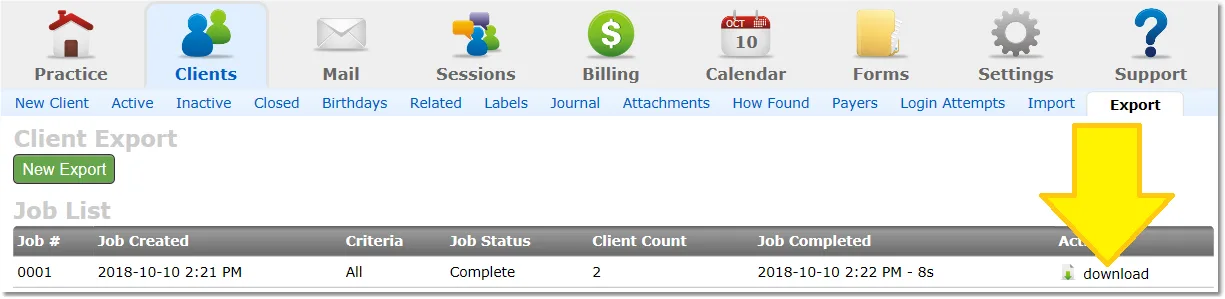
As long as you check every section in step 2, this export includes your session notes and progress notes, so there's no need to download them separately. If anything looks like it's missing after import, contact CounSol support and ask them to send the remaining records as CSV or Excel files.
When you've saved these files into your PracticepicnicImport folder, zip the folder and upload it to Practicepicnic.
If you're having trouble, please contact your account manager or support@practicepicnic.com.
Importing data from Jane
We'll download the following from Jane:
- Patient list (demographics)
- Appointments
- Notes
- Charts
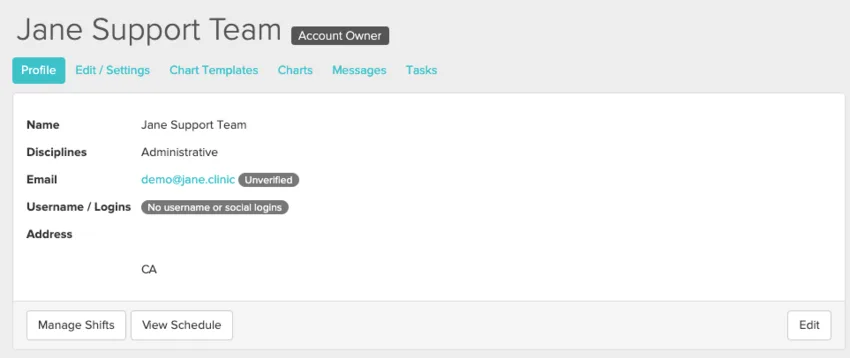
The Patient List and most reports are only available to an Account Owner or Full Access user, so make sure you're signed in with one of those accounts.
Create a folder on your Desktop named PracticepicnicImport to keep these files together.
Patient list (demographics)
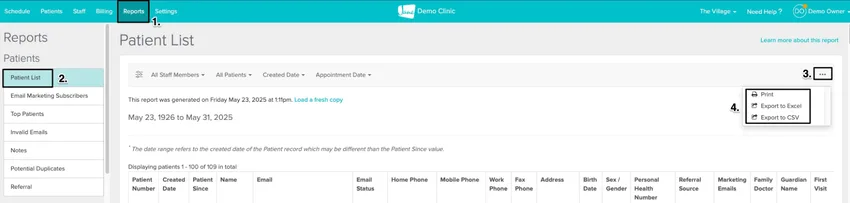
- Go to Reports > List and filter as needed.
- Click the three dots (…) and choose Export to Excel.
Appointments
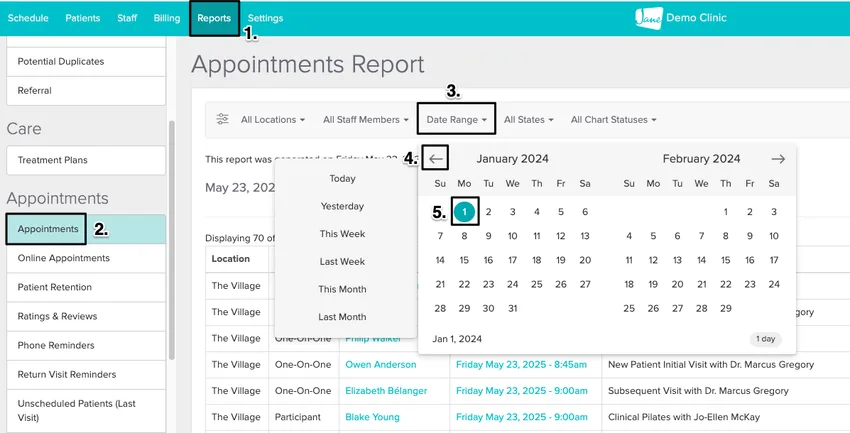
- Go to Reports > Appointments.
- Use the arrow on the left of the date selector to jump back to the first day you had appointments booked.
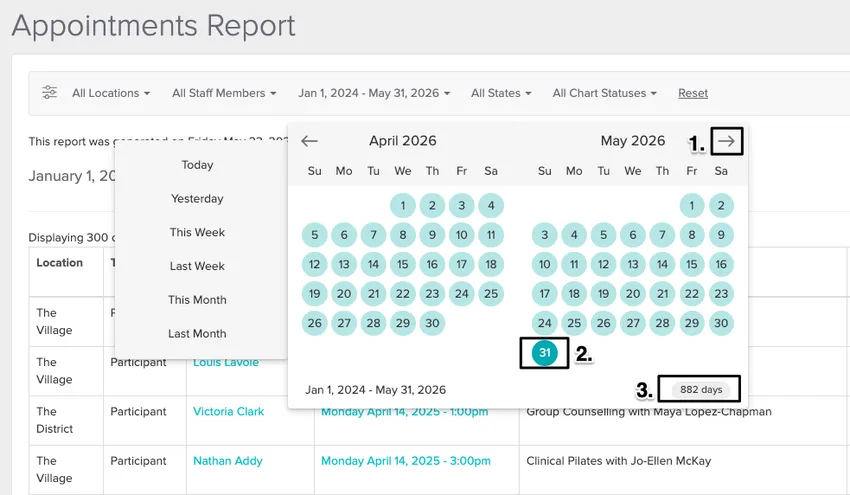
- Set the end date into next year so any pre-booked future appointments are included.
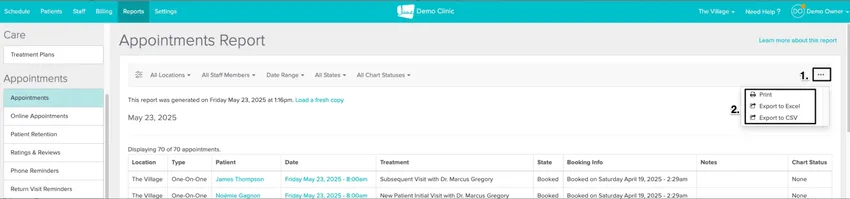
- Click the three dots (…) and choose Export to Excel. (Appointments can only be imported alongside the Patient List, so be sure to export both.)
Notes
- Go to Reports > Notes.
- Click the three dots (…) and choose Export to Excel.
Charts
Batch chart exports can only be requested by the Account Owner. Contact Jane support to request your chart export, then add the file to your folder.
When you've saved these files into your PracticepicnicImport folder, zip the folder and upload it to Practicepicnic.
If you're having trouble, please contact your account manager or support@practicepicnic.com.
Importing data from TherapyAppointment
We'll download the following from TherapyAppointment:
- Clients
- Client charts
- Client contacts
- Client files
- Treatment plans
Create a folder on your Desktop named PracticepicnicImport to keep these files together.
- Log into your TherapyAppointment account.
- Navigate to your profile page from the top right and click Your Profile.
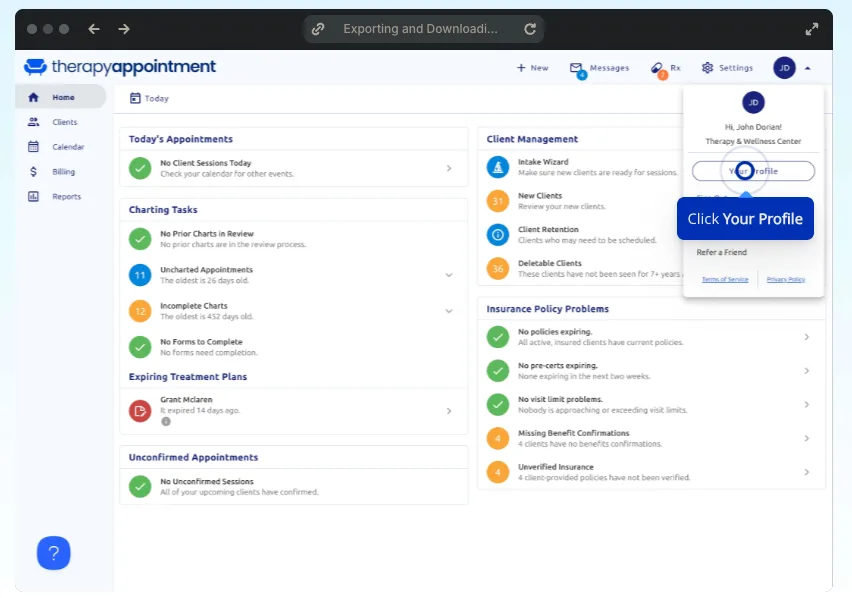
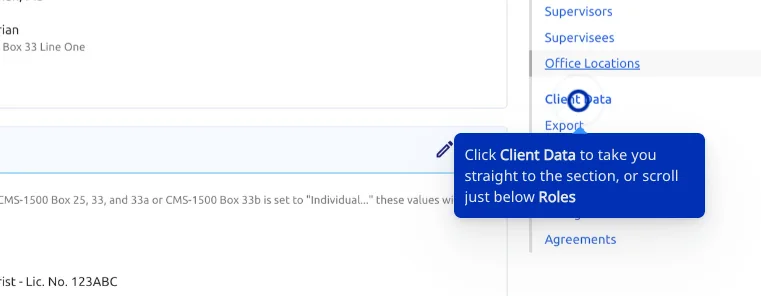
- Click Client Data from the right sidebar.
- You'll see a grid of different client data cards. Click Start on the following cards:
- Client Charts
- Client Contacts
- Client Files
- Clients
Treatment Plans
On some cards you may see Re-Export instead of Start — click that instead on those.
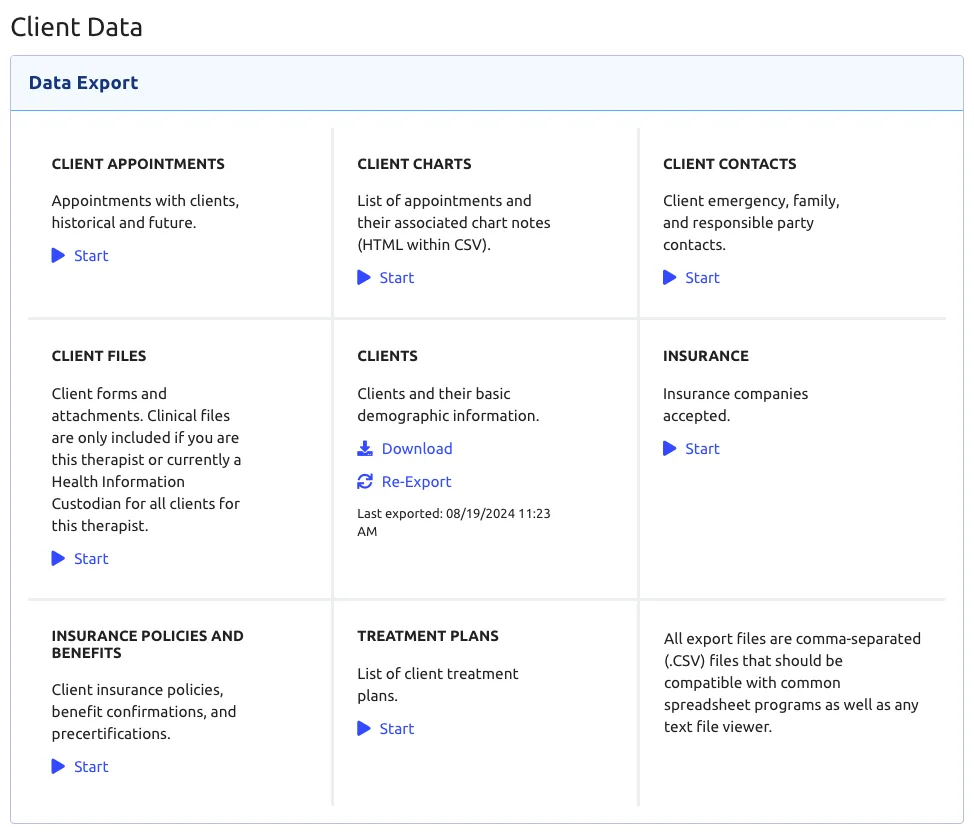
- The exports take some time to process. Check back on this page in an hour or so — you'll see a Download link next to each card you exported. Click Download on each card to save the file onto your computer, then move it into your PracticepicnicImport folder.
When you've saved these files into your PracticepicnicImport folder, zip the folder and upload it to Practicepicnic.
If you're having trouble, please contact your account manager or support@practicepicnic.com.
Importing data from TherapyZen
We'll download the following from TherapyZen:
- Client details
- Client notes
Create a folder on your Desktop named PracticepicnicImport to keep these files together.
Client details
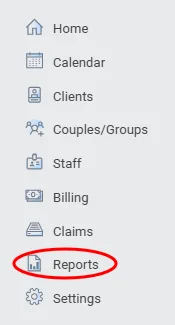
- In TherapyZen, navigate to Reports from the left sidebar.
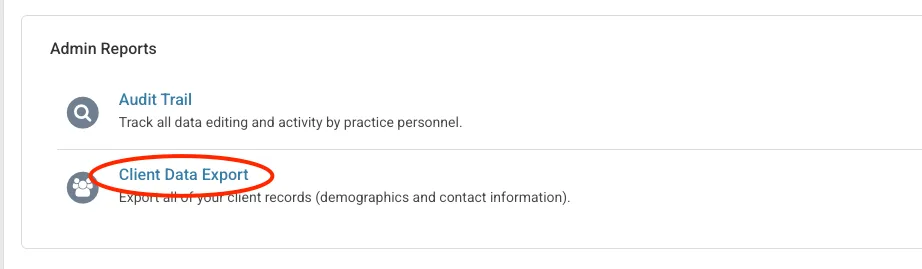
- Under Admin Reports, click Client Data Export.
- Click Export to Excel.
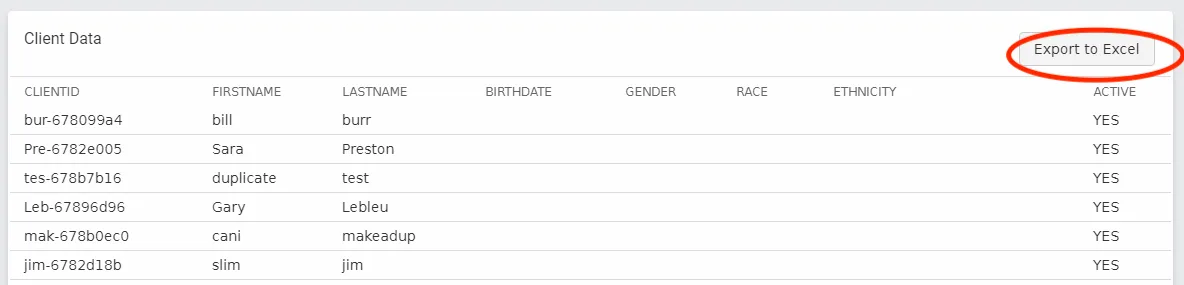
- Save this Excel file (
.xlsx) into your PracticepicnicImport folder.
Client notes
TherapyZen doesn't offer a way to download notes for all clients at once, but you can download all notes for one client in bulk. Repeat the steps below for each client.
- Open a client and go to their Notes tab.

- Click the Download icon at the top of the Notes tab.
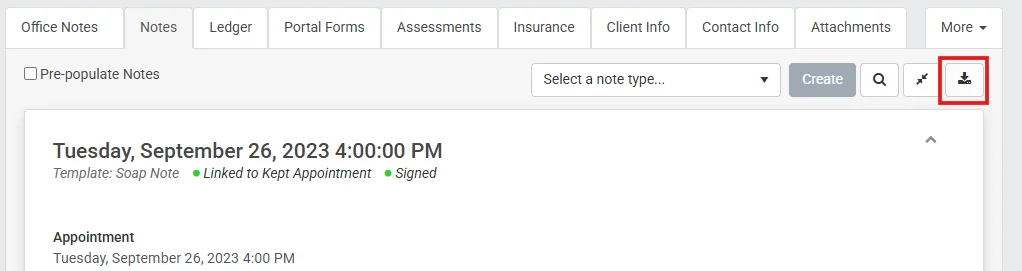
- Save the downloaded file into your PracticepicnicImport folder, then repeat for each client.
When you've saved these files into your PracticepicnicImport folder, zip the folder and upload it to Practicepicnic.
If you're having trouble, please contact your account manager or support@practicepicnic.com.
Importing data from Acuity
We'll download the following from Acuity:
- Client list
- Appointments
Create a folder on your Desktop named PracticepicnicImport to keep these files together.
Client list
- Go to Clients > Import/Export.
- Click Export Client List to download a CSV.
Appointments
- Go to Reports > Export.
- Choose your date range, decide whether to include cancelled appointments, then click Export Appointments to download a CSV.
When you've saved these files into your PracticepicnicImport folder, zip the folder and upload it to Practicepicnic.
Importing data from Charm EHR
We'll download the following from Charm EHR:
- Patient list
- Appointments
- Clinical notes (SOAP notes)
Create a folder on your Desktop named PracticepicnicImport to keep these files together.
Patient list
- Go to the Patients section and open the Patient List report.
- Click More Options (…) and export it as CSV. (Only users with Practice Admin permissions can export the patient list.)
Appointments
- Go to Calendar > Reports.
- Apply your date filters, click Show Report, then export to CSV.
Clinical notes
- To export individual SOAP notes for free, open a patient's Dashboard > Past Encounters and export each note as a PDF.
- For a bulk export of all notes, contact Charm EHR support about their batch export service. Either way, include something in the file name (like the patient's name) so we can link notes to the right patient.
When you've saved these files into your PracticepicnicImport folder, zip the folder and upload it to Practicepicnic.
If you're having trouble, please contact your account manager or support@practicepicnic.com.
Importing data from DrChrono EHR
We'll download the following from DrChrono:
- Patient list
- Appointments
- Charts
Create a folder on your Desktop named PracticepicnicImport to keep these files together.
Patient list
- Go to the Patients tab and select Patient List.
- Click Export (CSV) in the top right corner.
Appointments
- Go to the Reports tab and select Appointment Report.
- Apply the available filters and set the date range to cover your full history (past and future).
- Click Export to File — the CSV will appear in your message center.
Charts
DrChrono stores charts through the Acronis service. Contact DrChrono support for instructions on retrieving your charts, then add the file to your folder.
When you've saved these files into your PracticepicnicImport folder, zip the folder and upload it to Practicepicnic.
If you're having trouble, please contact your account manager or support@practicepicnic.com.
Importing data from IntakeQ
We'll download the following from IntakeQ:
- Client list
- Client data and intake forms
- Appointments
- Insurance claims
- Client files
Create a folder on your Desktop named PracticepicnicImport to keep these files together.
Client list
- Go to Lists > Clients.
- Click Export Clients below the search field and choose all clients (or your filtered results) to download a CSV.
Client data and intake forms
- Go to More > Extract Data.
- Create an export profile by selecting the questionnaires you want and dragging the desired fields into columns.
- Apply a date range and select the records to extract.
Appointments
- Go to Lists > Appointments, apply any filters, then click Export > Export to CSV.
Insurance claims
- Go to Lists > Claims, apply any filters, then click Export to CSV.
Client files
- Go to Lists > Clients and click Open on a client.
- Use the ellipsis (…) menu to export their notes, intake forms, or both.
When you've saved these files into your PracticepicnicImport folder, zip the folder and upload it to Practicepicnic.
If you're having trouble, please contact your account manager or support@practicepicnic.com.
Importing data from Sessions Health
Sessions Health exports everything into a single file, so you don't need to create a folder or zip anything for this one.
- Log in to Sessions Health and go to Account Settings > Data Export, then click Add.
- Select All Clients and All Data, then click Generate Export. Leave Combine documents into a single file unchecked.
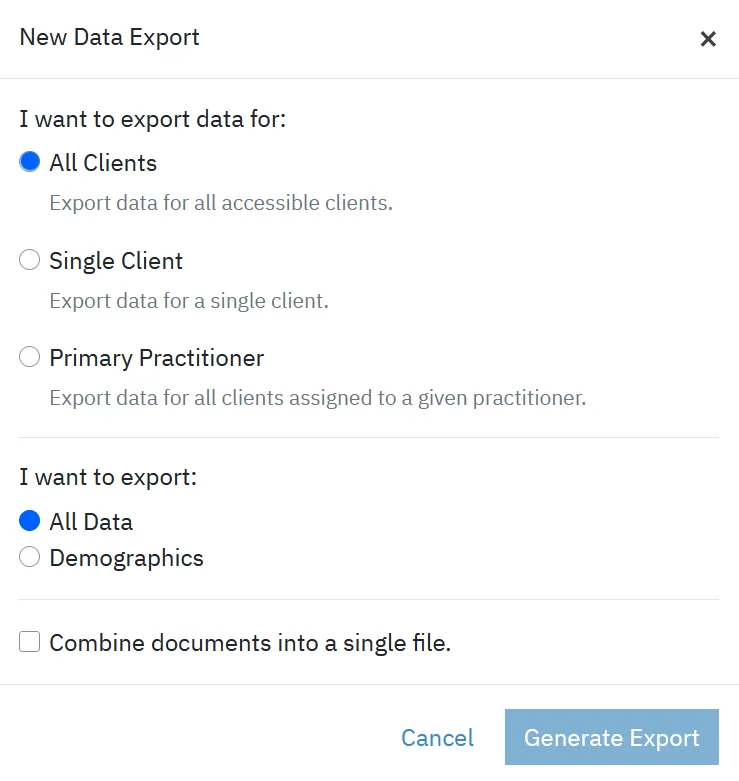
- Once the export is ready, download the file onto your computer.
When you've downloaded the file, upload it to Practicepicnic — there's no need to zip a single file.
If you're having trouble, please contact your account manager or support@practicepicnic.com.
Importing data from Practice Better
We'll download the following from Practice Better:
- Client archive (contact info, session notes, and booking history)
- Contacts
Create a folder on your Desktop named PracticepicnicImport to keep these files together.
Client archive
- Go to My Clients and click the more options button next to a client.
- Select Export data.
- Choose the items to include (Personal & Contact Information and Session Notes & Booking History).
- Click Create Archive. You'll get an email when the
.ziparchive is ready to download. - Repeat for each client (or each clinician's clients).
Contacts
- Go to My Clients and click Export contacts from the Fast Action Button.
When you've saved these files into your PracticepicnicImport folder, zip the folder and upload it to Practicepicnic.
If you're having trouble, please contact your account manager or support@practicepicnic.com.
Don't see your platform? Request a custom import
If your previous system isn't listed above, you can still bring your data over with a custom data import. Let your account manager know — or email support@practicepicnic.com — that you'd like a custom import, and we'll help you export from your old system and get everything set up in Practicepicnic.
Zip your PracticepicnicImport folder
Once all of your files are in the PracticepicnicImport folder on your Desktop, compress (zip) it so you can upload it to Practicepicnic in one step. Follow the instructions for your operating system.
Windows
- Open File Explorer and find your PracticepicnicImport folder on your Desktop.
- Right-click the folder.
- Select Compress to ZIP file.
Mac
- Open Finder and find your PracticepicnicImport folder on your Desktop.
- Right-click (or hold Control and click) the folder.
- Select Compress "PracticepicnicImport".
This creates a PracticepicnicImport.zip file next to your folder.
Upload to Practicepicnic
Now upload your zip file and let Practicepicnic import and organize your data. This can take a few hours, and you'll receive a notification when the import is complete.
- Go to Settings > Import Data.
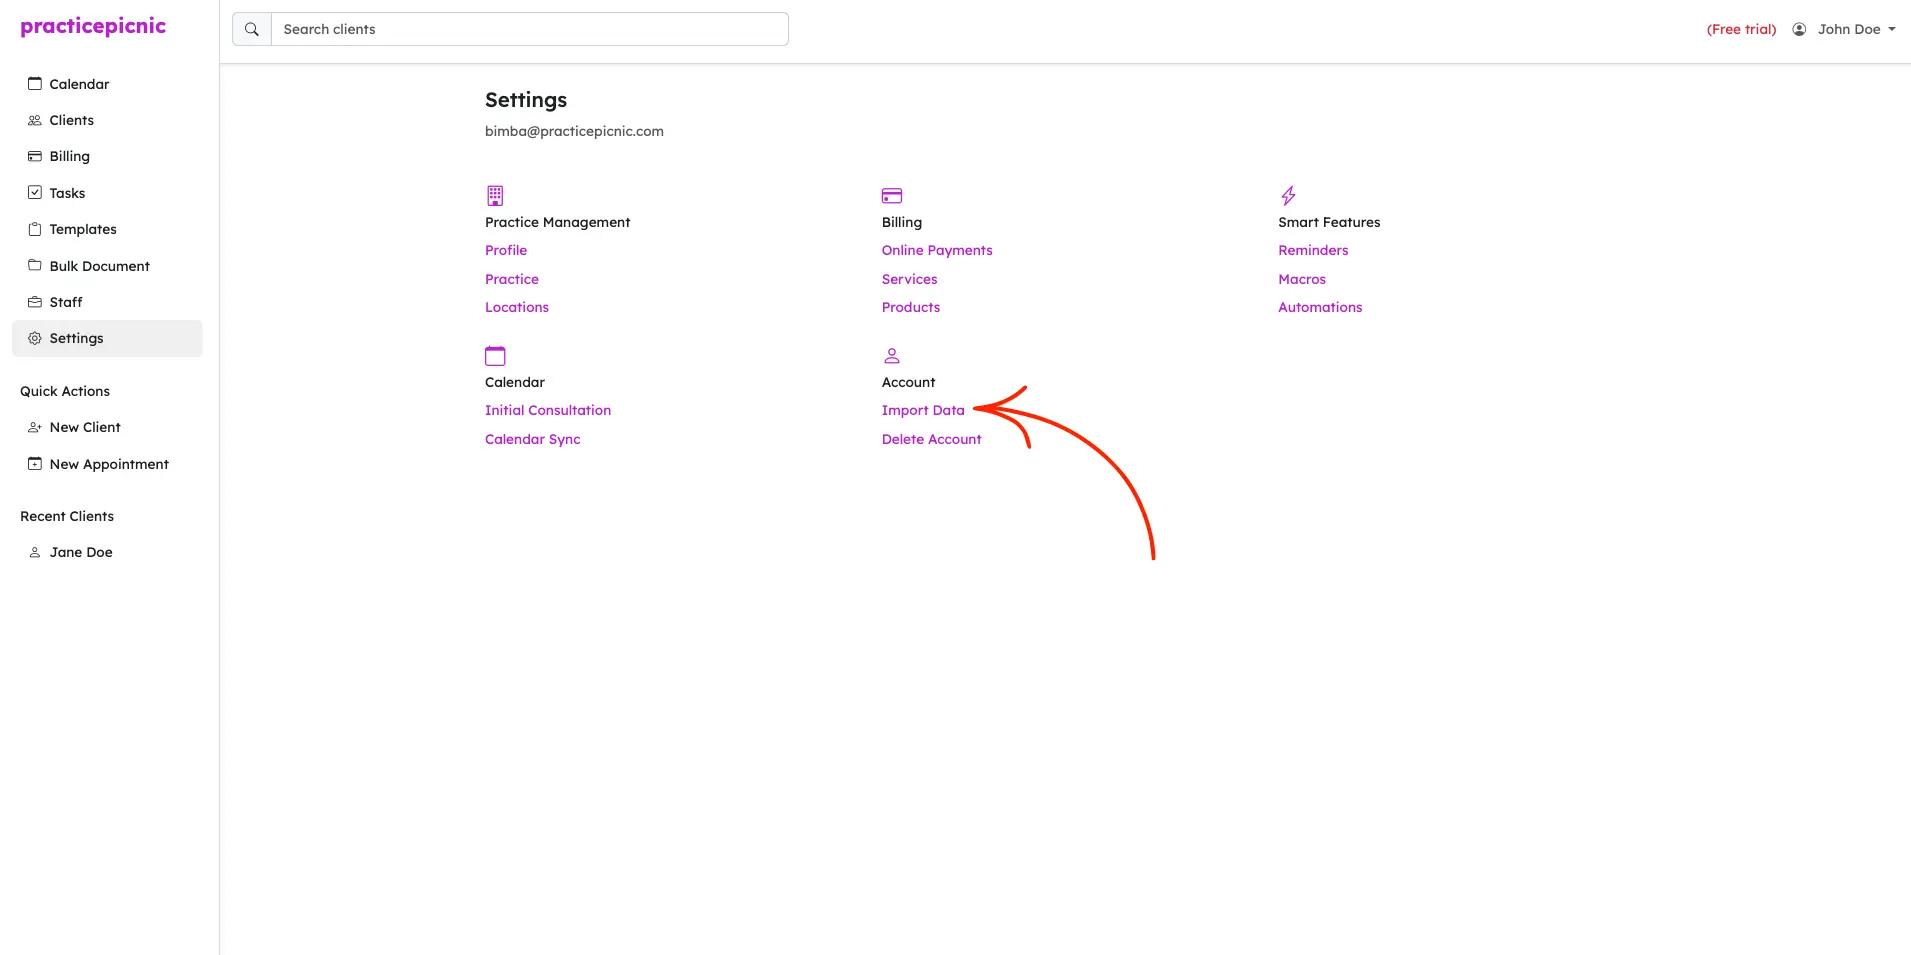
- Upload your PracticepicnicImport.zip file. (If you only have a single file to import, you can upload it directly without zipping.)
- Under Where are you importing data from?, select your previous system from the dropdown. If it isn't listed, choose Other and type the system name in the Additional Information field.
- Click Import.
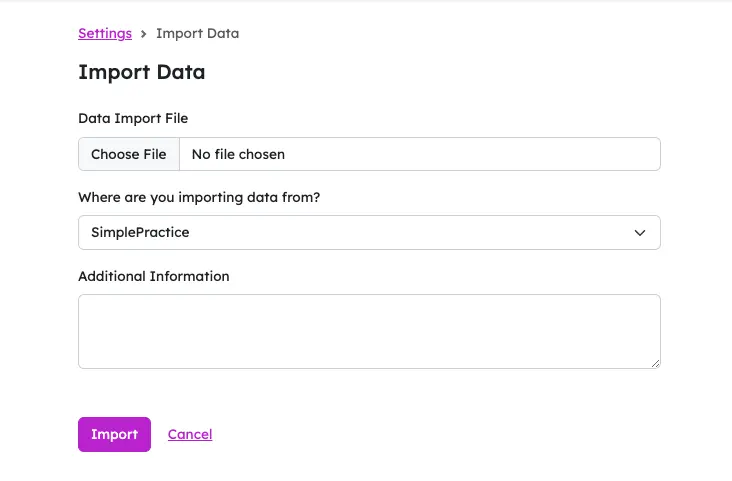
That's it! Importing will take a few hours, and you'll receive a notification when it's complete.
If you're having trouble, please contact your account manager or support@practicepicnic.com.